If you want to build the best home office setup in 2026, you need an honest reality check: your chair and eye-level alignment determine if your back hurts by 3 PM, not an expensive walnut desk. You don’t have to spend thousands on high-end designer gear to stay comfortable and productive during a long day at the desk. With only $500 to work with, the right approach is to buy practical ergonomic support first, ignore the overpriced aesthetic clutter, and spend your money where it actually makes a difference to your day to day workflow. This guide will show you how to spend every last dollar on seating, display positioning and necessary peripherals to build a reliable home office setup that lasts.
- 01. Best Budget Home Office Setup
- 02. Don’t Buy the Desk First: Fix Your Seating First
- 03. Why One Solid Monitor Beats a Cheap Dual-Screen Setup
- 04. The Desk: Keep It Simple and Functional
- 05. Keyboard and Mouse: Comfort Over Fancy RGB
- 06. USB Hubs and Dongles: Don’t Waste Money on Fancy Docks
- 07. Desk Lighting: Simple Ways to Cut Screen Glare
- 08. Cable Clutter: A Clean Setup for Under Ten Dollars
- 09. Best Buying Order for Home Office Setup
- 10. What to Build Today With a Realistic $500 Budget
Key Takeaways 🔍
- $500 Split: Mesh task chair ($180) + Solid desk ($130) + Gas-spring monitor arm ($40) + Ergonomic keyboard & mouse ($60) + Targeted lighting ($40). $50 is left over for taxes, shipping.
- Posture Over Pretty Wood: Your chair mechanics and eye-level screen height fix 90% of neck and back strain. An expensive hardwood tabletop fixes zero aches.
- The $180 Rule: Get a real task chair with real lumbar support. Those $60 faux-leather gaming chairs flatten out in three months.
- Lift The Screen: A $40 monitor arm can save you from hunching, saving your neck far better than a $400 designer desk shelf.
- Cut The Fluff: RGB strips, plastic plants, and felt desk mats don’t improve workflow. Buy a vertical mouse and wrist rest first.
- Real World Value: A disciplined home office setup under $500 can give you about 90% of the daily comfort of a multi-thousand-dollar studio.
Best Budget Home Office Setup
2026’s best home office setup comes down to four essentials: a good task chair made of breathable mesh to avoid killing your back, a sturdy 48-inch desk for physical stability, a reliable screen riser, and an ergonomic keyboard and mouse combo. Keeping the entire build under $500 means you have to ditch the overpriced design branding and focus on pure utility. No luxury aluminum accents or motor-driven height presets here, as the goal of this build is practical daily relief instead of showing off an empty aesthetic.
This setup earns its place during tough 8-hour workdays. A good mesh task chair keeps your pelvis properly aligned during long typing sessions. Lifting your display to natural eye level ends recurring upper-back cramps, while a contoured vertical mouse prevents wrist burnout by late afternoon. There’s nothing delicate here, and nothing that needs an expensive replacement after six months. That durable purposefulness is what makes this a practical home office setup for someone on a reasonable budget.
| Core Gear | Proven Budget Pick | Target Price | Real-World Benefit |
|---|---|---|---|
| Task Chair | Sihoo M18 / Ticova Mesh | ~$180 | Adjustable lumbar stops lower back slump during long shifts |
| Desk | CubiCubi / FEZIBO 48-inch | ~$130 | Solid steel frame prevents screen wobble while typing fast |
| Monitor Arm | North Bayou (NB F80) | ~$40 | Clears desk surface and brings screen directly to eye line |
| Keyboard & Mouse | ProtoArc EM01 + Anker | ~$60 | Natural handshake grip ends wrist pressure and hand cramps |
| Task Light | Baseus / Quntis Screenbar | ~$40 | Illuminates your keys without throwing glare onto the display |
| Total Build | Full 5-Piece Workstation | ~$450 | Saves a clean $50 buffer for local taxes or shipping fees |
If you have extra money to spend, skip the fancy decorations and focus on the parts that matter most. An Anker PowerConf C200 2K webcam ($50) makes video during meetings much clearer. A 7-in-1 Anker USB-C hub ($35) lets you dock everything through a single laptop cable. A simple felt desk pad ($20) protects your tabletop from mouse scuffs. Even with all three upgrades added, your whole workstation stays under $600 while keeping the core value intact.
Don’t Buy the Desk First: Fix Your Seating First
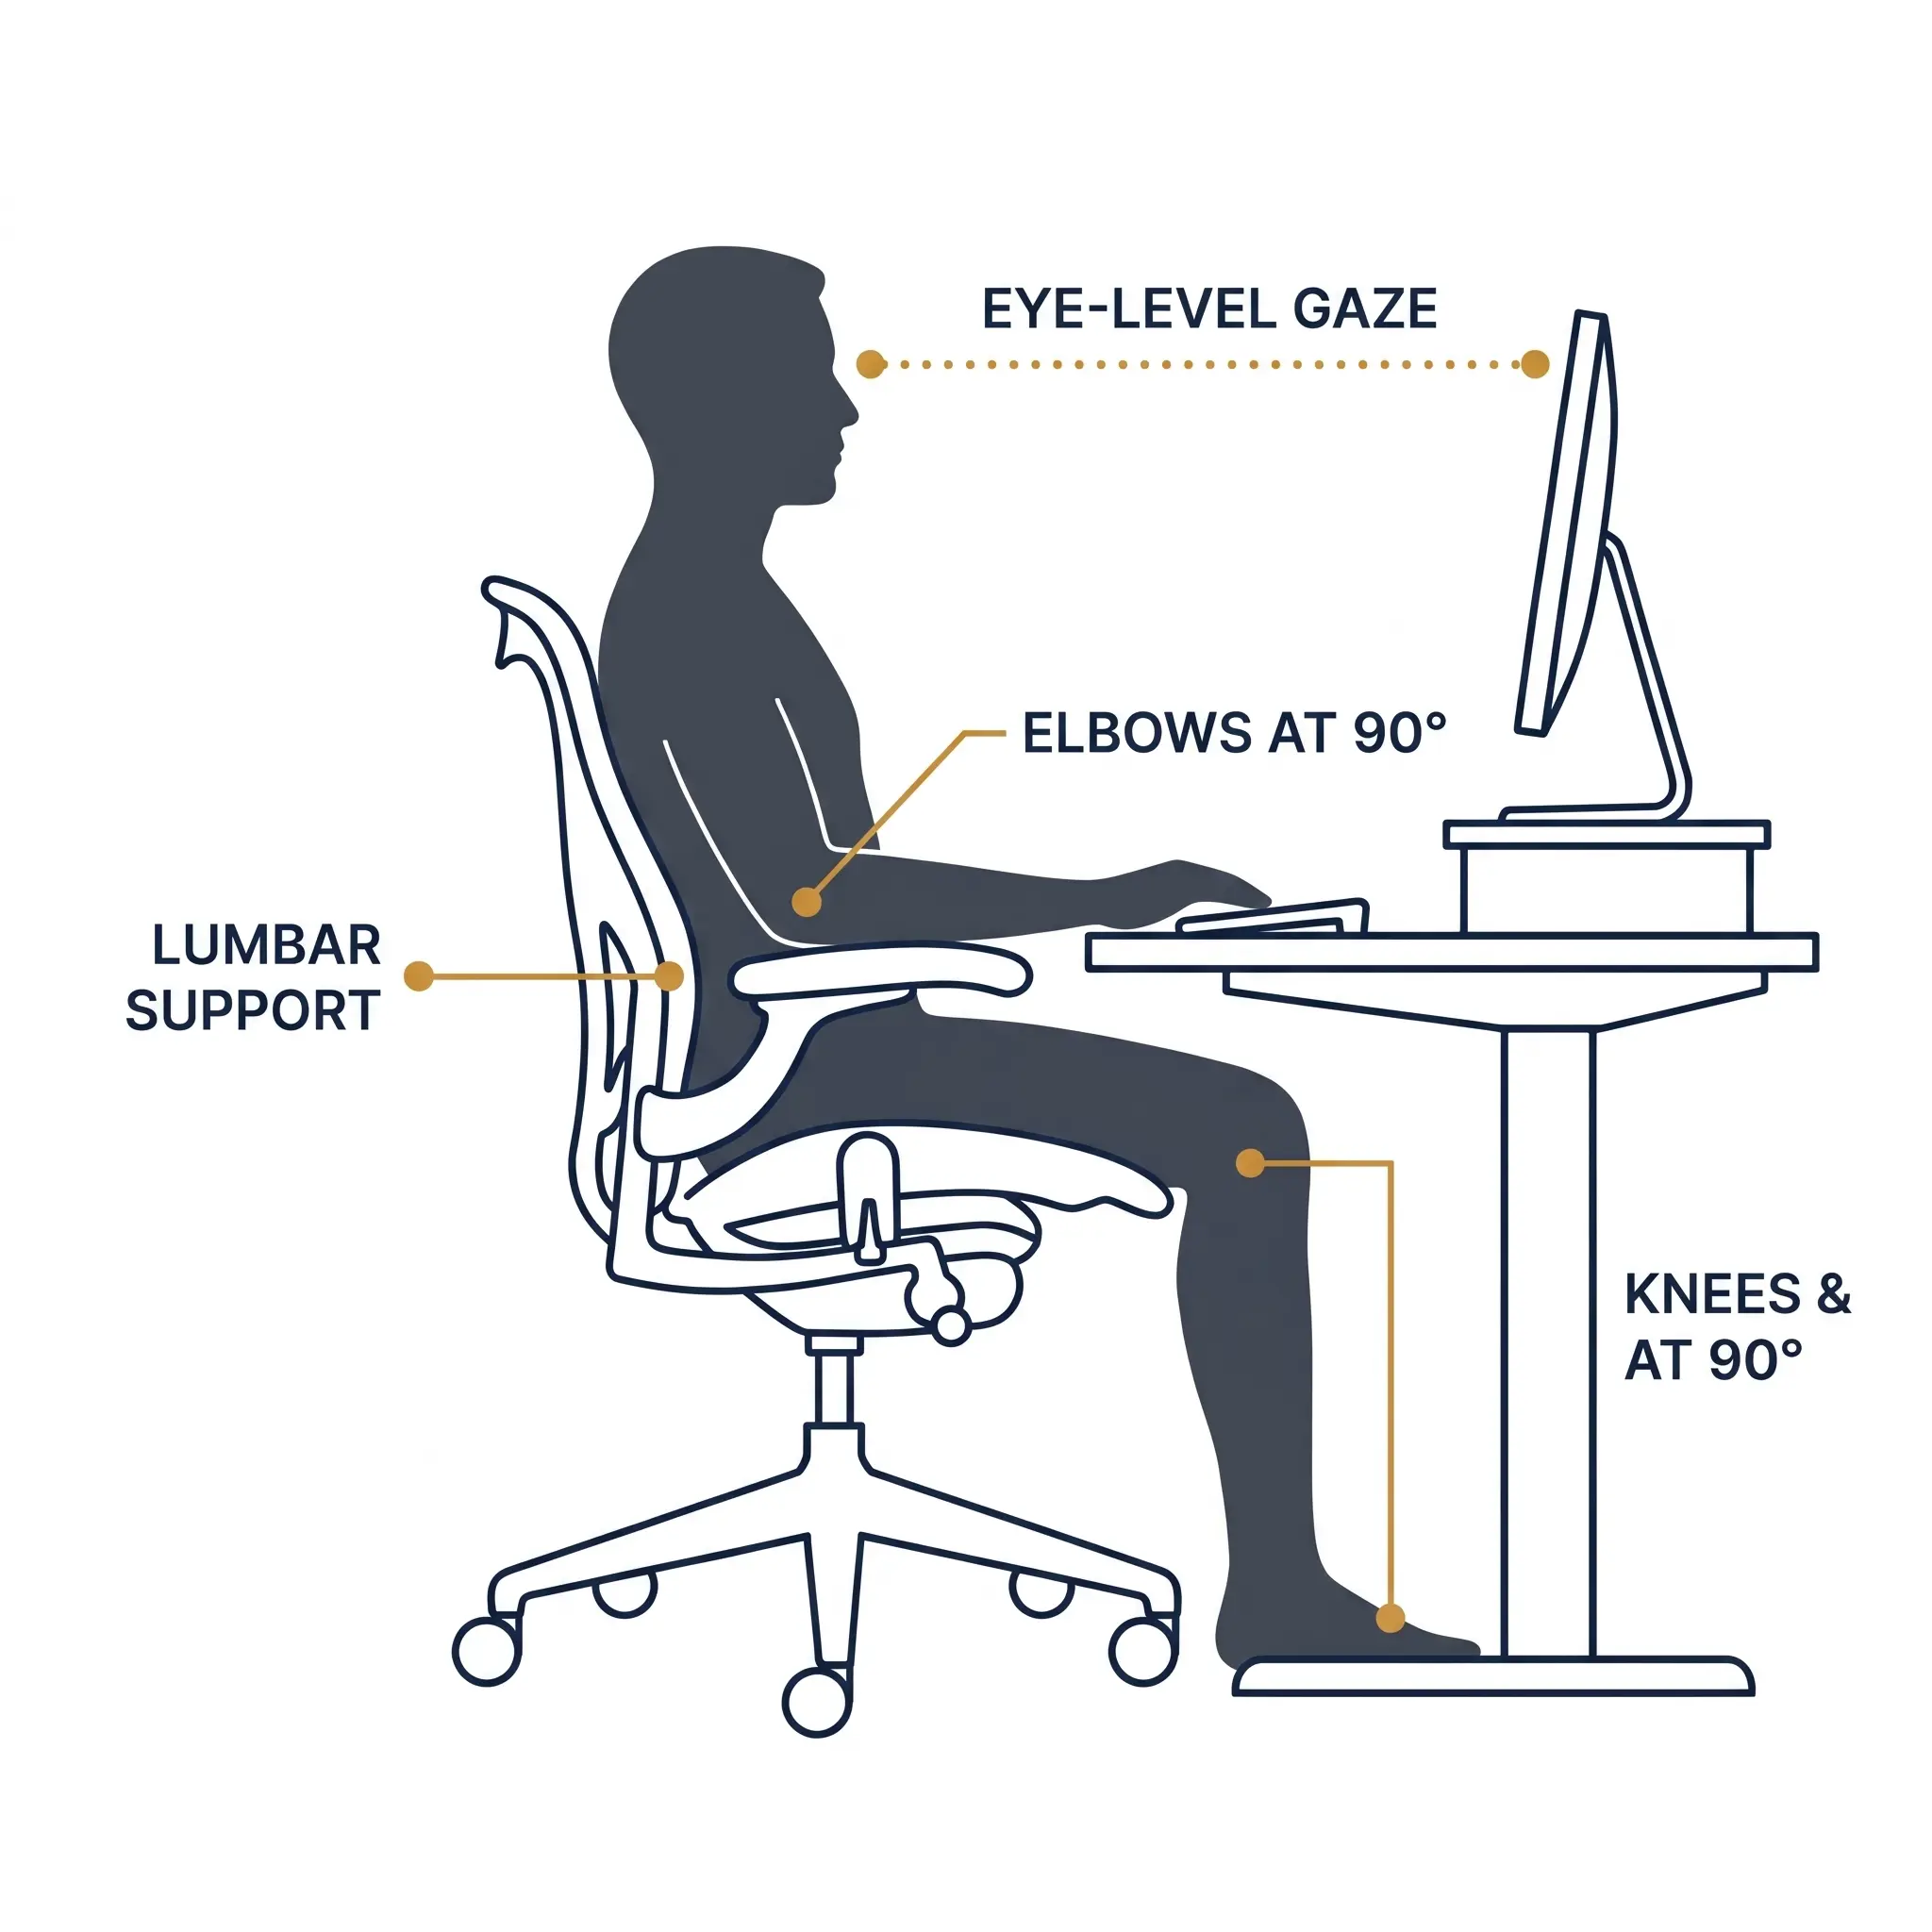
Most people setting up a workstation blow half their cash on an aesthetic wooden desk right away. That approach is completely backwards when building a practical home office setup. You can easily get through a solid workday using a dining table, but an unsupportive seat will destroy your lower back within two hours.
When shopping under a strict budget, independent lumbar adjustments matter far more than brand names. Look for a backrest that moves both vertically and front-to-back instead of a fixed plastic mold. Everyone’s spine sits at a different curve, and a static lumbar bump pressing into the wrong vertebrae creates painful pressure points over an eight-hour shift.
Seat depth and breathable mesh complete the foundation of any reliable home office setup. Choose a chair that leaves a two-finger gap behind your knees to keep leg circulation moving freely. High-density mesh beats bonded faux leather every time, preventing heat buildup and keeping its shape long after cheap foam cushions flatten out.
Why One Solid Monitor Beats a Cheap Dual-Screen Setup
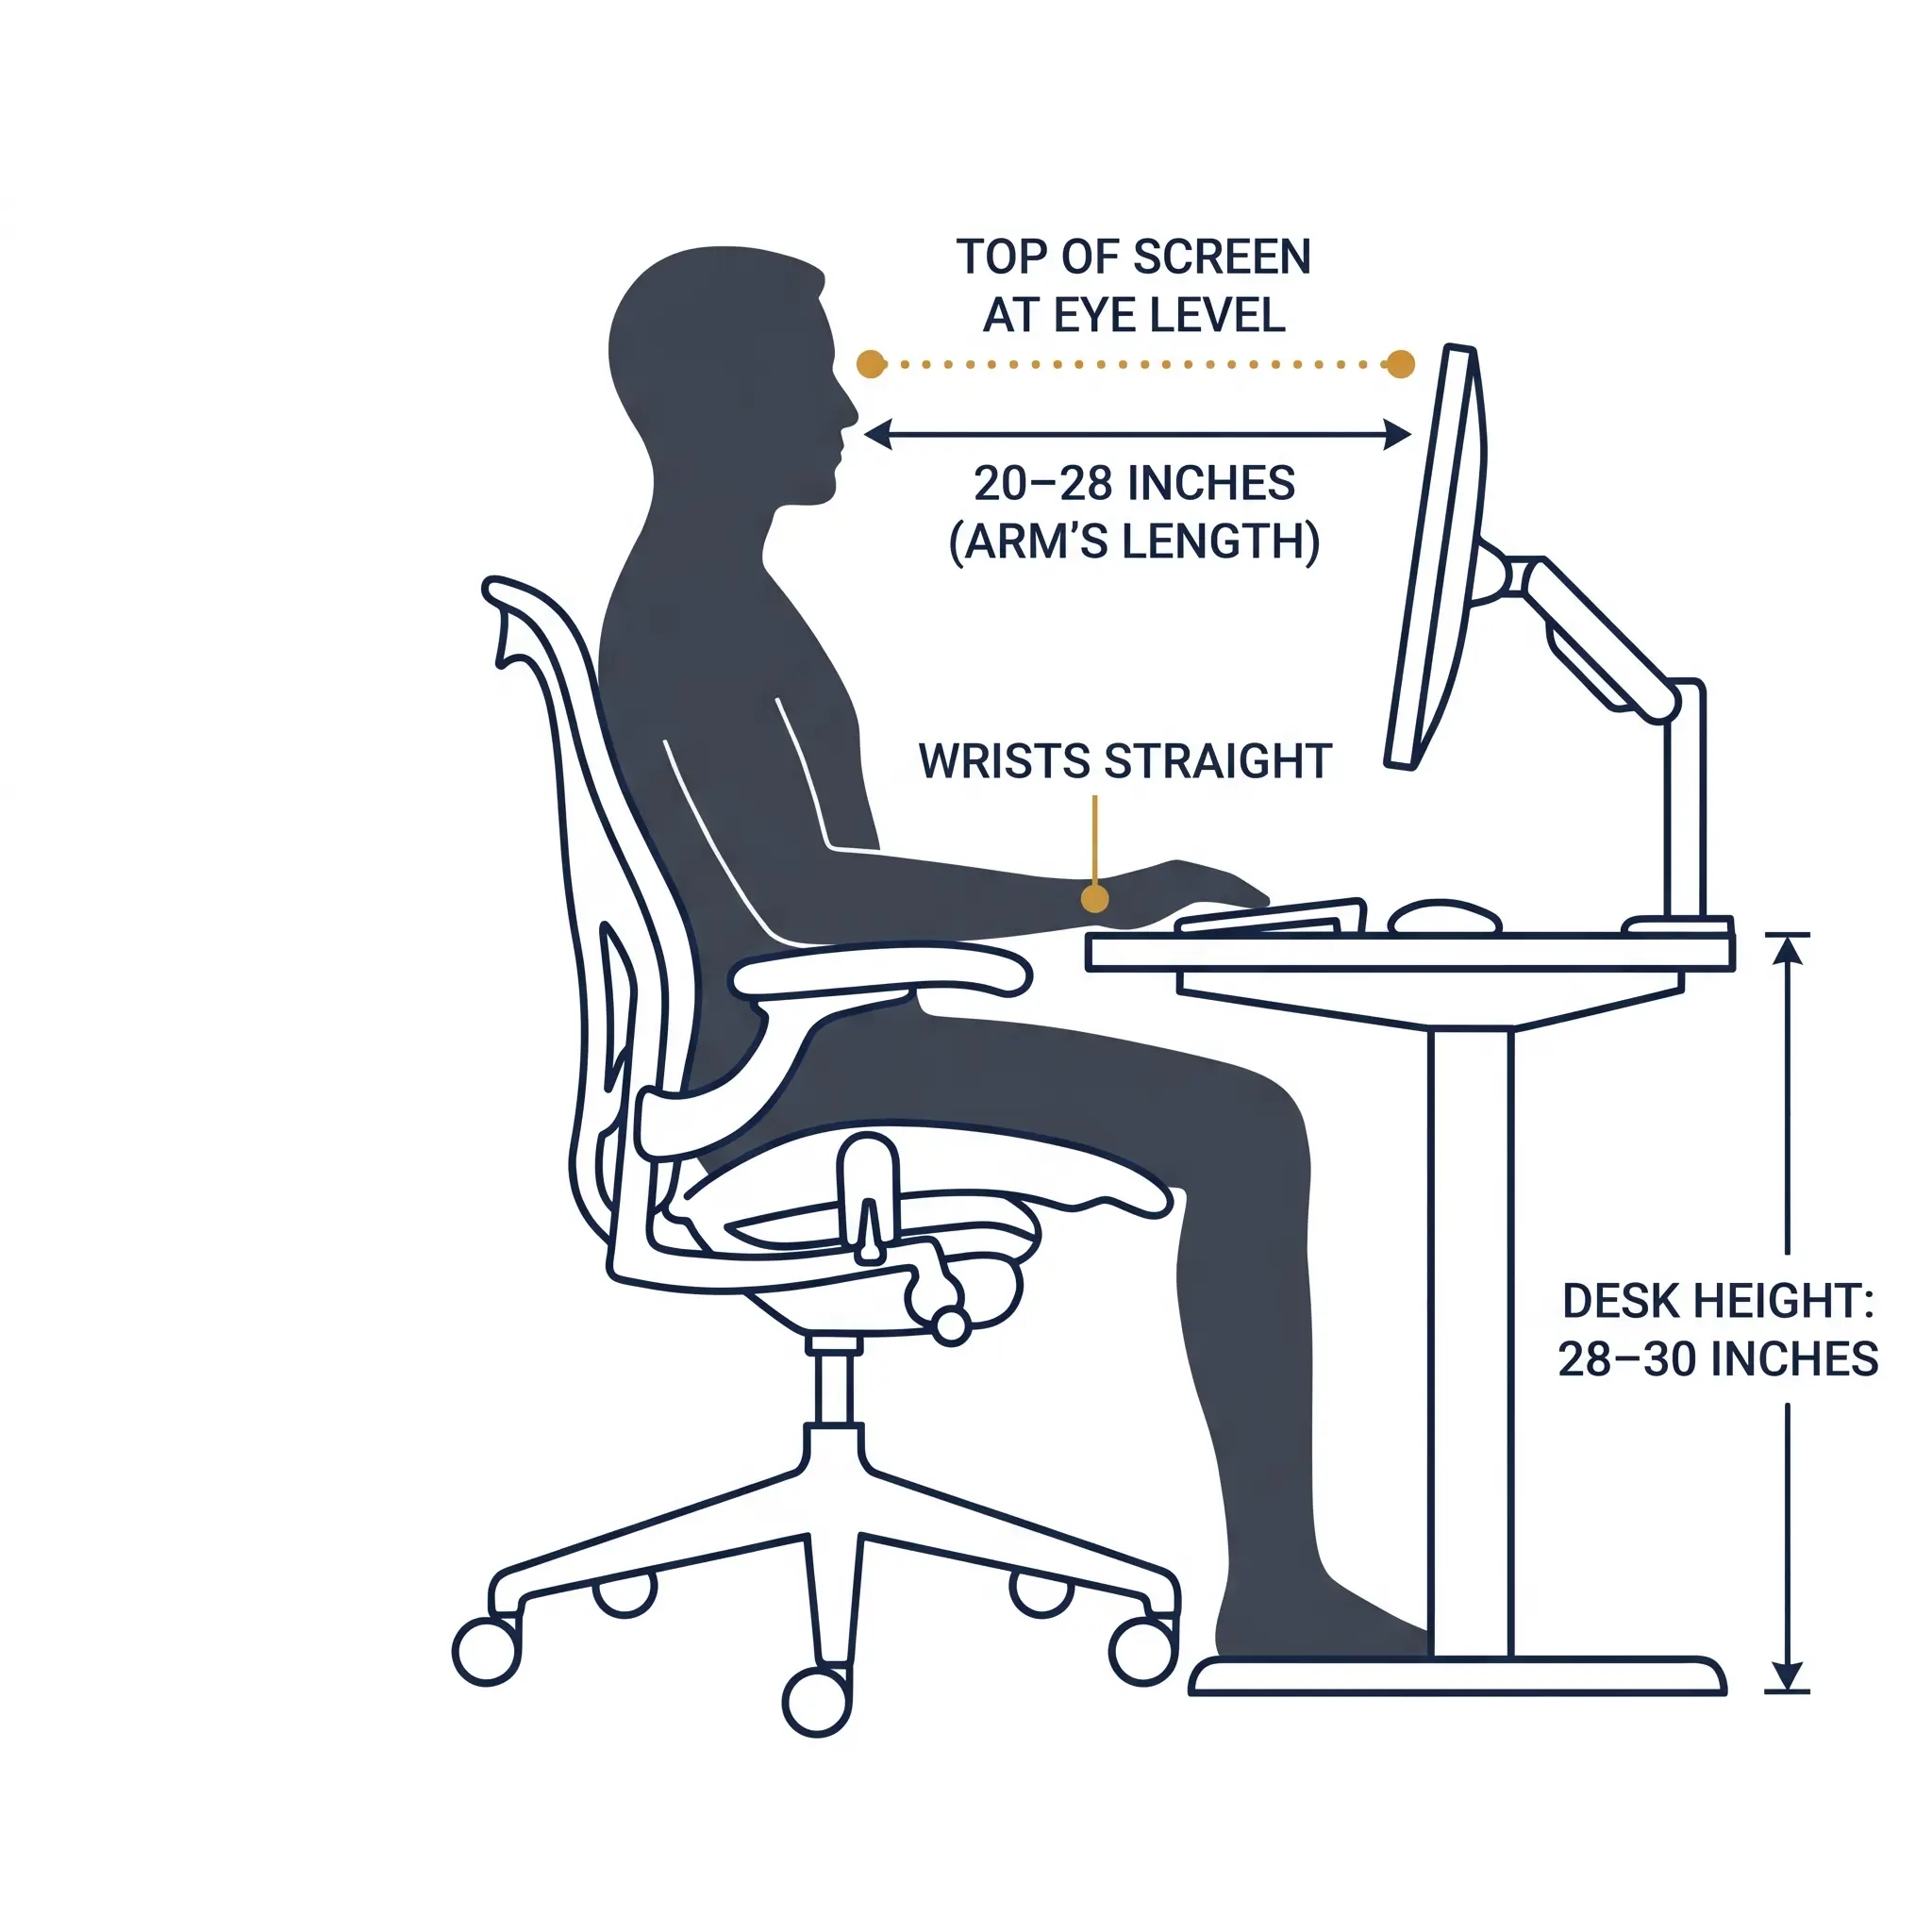
Splitting a budget across two cheap screens usually leaves you with washed-out panels and thick borders right in your visual center. In a budget home office setup, putting that money into a 24 or 27-inch IPS display delivers accurate colors, wider viewing angles, and far less cable mess on the desk.
Proper placement matters as much as screen size. Keep the monitor directly at an arm’s length (about 20 to 28 inches) and make sure the top bezel aligns with your natural eye level. This simple alignment prevents neck fatigue and keeps your posture upright across long workdays in your home office setup.
The Desk: Keep It Simple and Functional
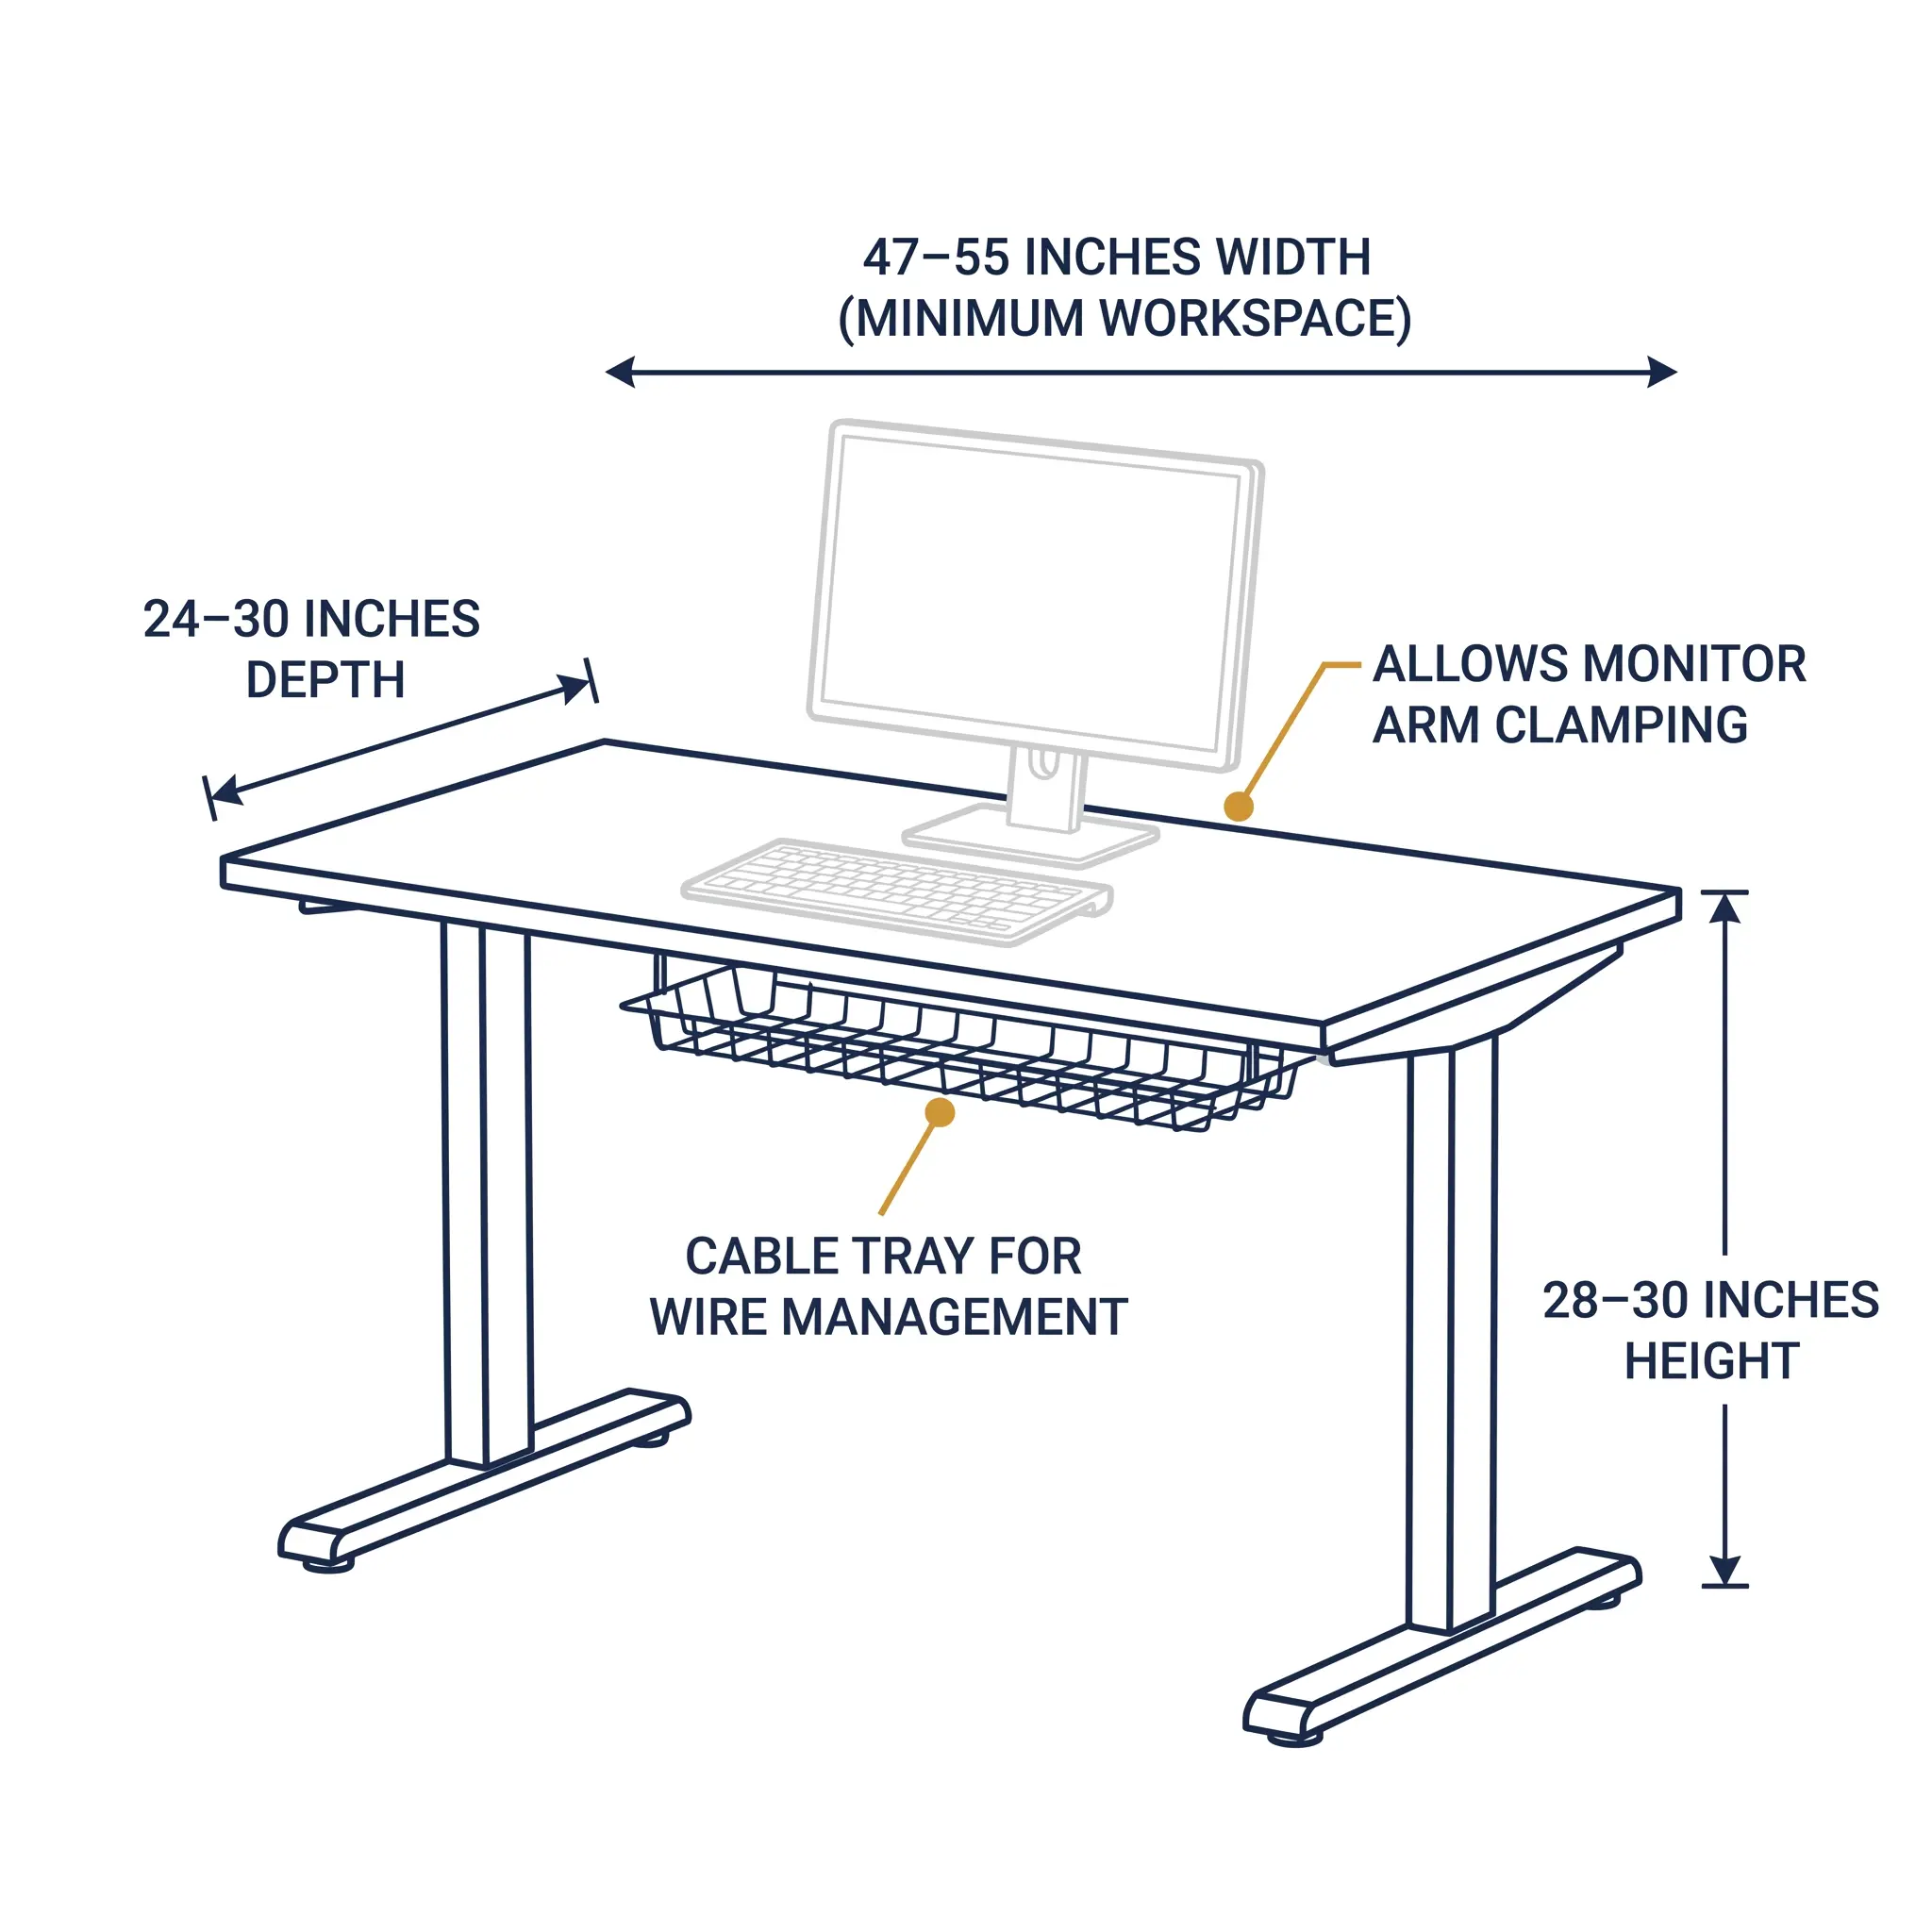
Your desk brings everything together. You don’t need to spend a lot of money on it. In a home office, what really matters is stability and how much space you have to work with, not fancy motorized legs or expensive wood finishes.
The important size to check is the depth. Look for at least 24 to 30 inches of depth so your monitor stays at a comfortable distance and doesn’t crowd your keyboard. A width between 47 and 55 inches gives you plenty of room without taking over the space.
Electric standing desks are helpful if you sit for hours, but a regular fixed-height desk with a monitor riser works just fine. Make sure the bottom of the desk has room to slide in a wire tray. That keeps cables off the floor and keeps your home office setup looking clean.
A simple desk mat finishes the look. Neoprene or faux leather is smooth, protects the desk surface, reduces typing noise, and keeps your mouse and keyboard in place. It helps keep your home office setup tidy and functional.
Keyboard and Mouse: Comfort Over Fancy RGB
A lot of budget buyers waste money chasing flashy gaming gear with glowing backlights that add zero utility. In a daily home office setup, rainbow RGB lights will not save your wrists during a ten-hour shift. True comfort comes from tactile key switches and a flat board angle that keeps your tendons relaxed, aligning directly with standard safety recommendations like the OSHA computer workstations guide for keyboards.
Board size directly dictates your upper-body posture across long hours. For a practical home office setup, skipping the unnecessary number pad with a Tenkeyless (TKL) or 75% board pulls your mouse arm inward, preventing chronic shoulder strain. Well-built options like Keychron, detailed in RTINGS keyboard latency and comfort reviews, offer quiet mechanical switches that feel responsive without waking the whole house.
Shape matters far more than high-DPI gaming sensors when choosing your pointer. An awkward gaming mouse forces your forearm into an unnatural flat twist, whereas a contoured grip or vertical mouse rests your hand in an easy handshake angle. Upgrading to a wrist-friendly tool like an Anker vertical mouse or MX Master prevents nerve tension and quietly finishes a reliable home office setup.
USB Hubs and Dongles: Don’t Waste Money on Fancy Docks
Buying a docking station often causes people to spend much money because companies make a big deal about expensive options like $300 Thunderbolt 4 docks or CalDigit-style docks that most people don’t really need. The truth is, one single cable can handle screen display, mouse input and charging if you check that your laptops USB-C port has DisplayPort Alt Mode (DP Alt Mode) and USB Power Delivery (PD). Of spending half your budget on high-end equipment a reliable multi-port adapter that costs between $30 and $45 such as the Anker 555 (8-in-1) or the Baseus Metal Gleam Series can easily show 4K at 60Hz and provide up to 85W of clean power directly to your laptop.
Picking one of these USB-C adapters keeps the mess of cords off your desk without wasting money giving you cash, for real comfort in your home office setup.
Desk Lighting: Simple Ways to Cut Screen Glare
Eyestrain during late work sessions usually stems from extreme contrast between a bright display and a pitch-black room. Instead of a traditional desk lamp that bounces harsh reflections directly off the screen glass, an asymmetrical monitor light bar mounts onto your display bezel and casts illumination strictly downward onto your desk surface. Proven budget models like the Quntis ScreenBar or Baseus i-wok deliver a solid 95 CRI rating with adjustable warmth (3000K to 6500K) for under $35, cutting panel reflections entirely without taking up any tabletop footprint.
Balancing that downward desk light with soft ambient room lighting stops your pupils from constantly dilating between bright screens and dark surroundings. This single affordable tweak prevents evening fatigue and keeps your eyes relaxed throughout long workdays in your home office setup.
Cable Clutter: A Clean Setup for Under Ten Dollars
Dangling power bricks and tangled cords do more than look messy; they create accidental snag hazards that can yank your laptop or monitor right off the table. You do not need expensive raceway kits or complicated tools to fix this. A simple no-drill, clamp-on mesh or wire basket (under $15) hung under the back edge of your desk gets power strips, heavy adapters, and excess wire slack completely off the floor.
Combine that basket with a pack of reusable hook-and-loop Velcro ties and adhesive cable routing clips ($5 to $8) to run single lines along the desk frame. Bundling cables into a single trunk creates a clean, distraction-free home office setup in less than fifteen minutes without drilling a single screw.
Best Buying Order for Home Office Setup
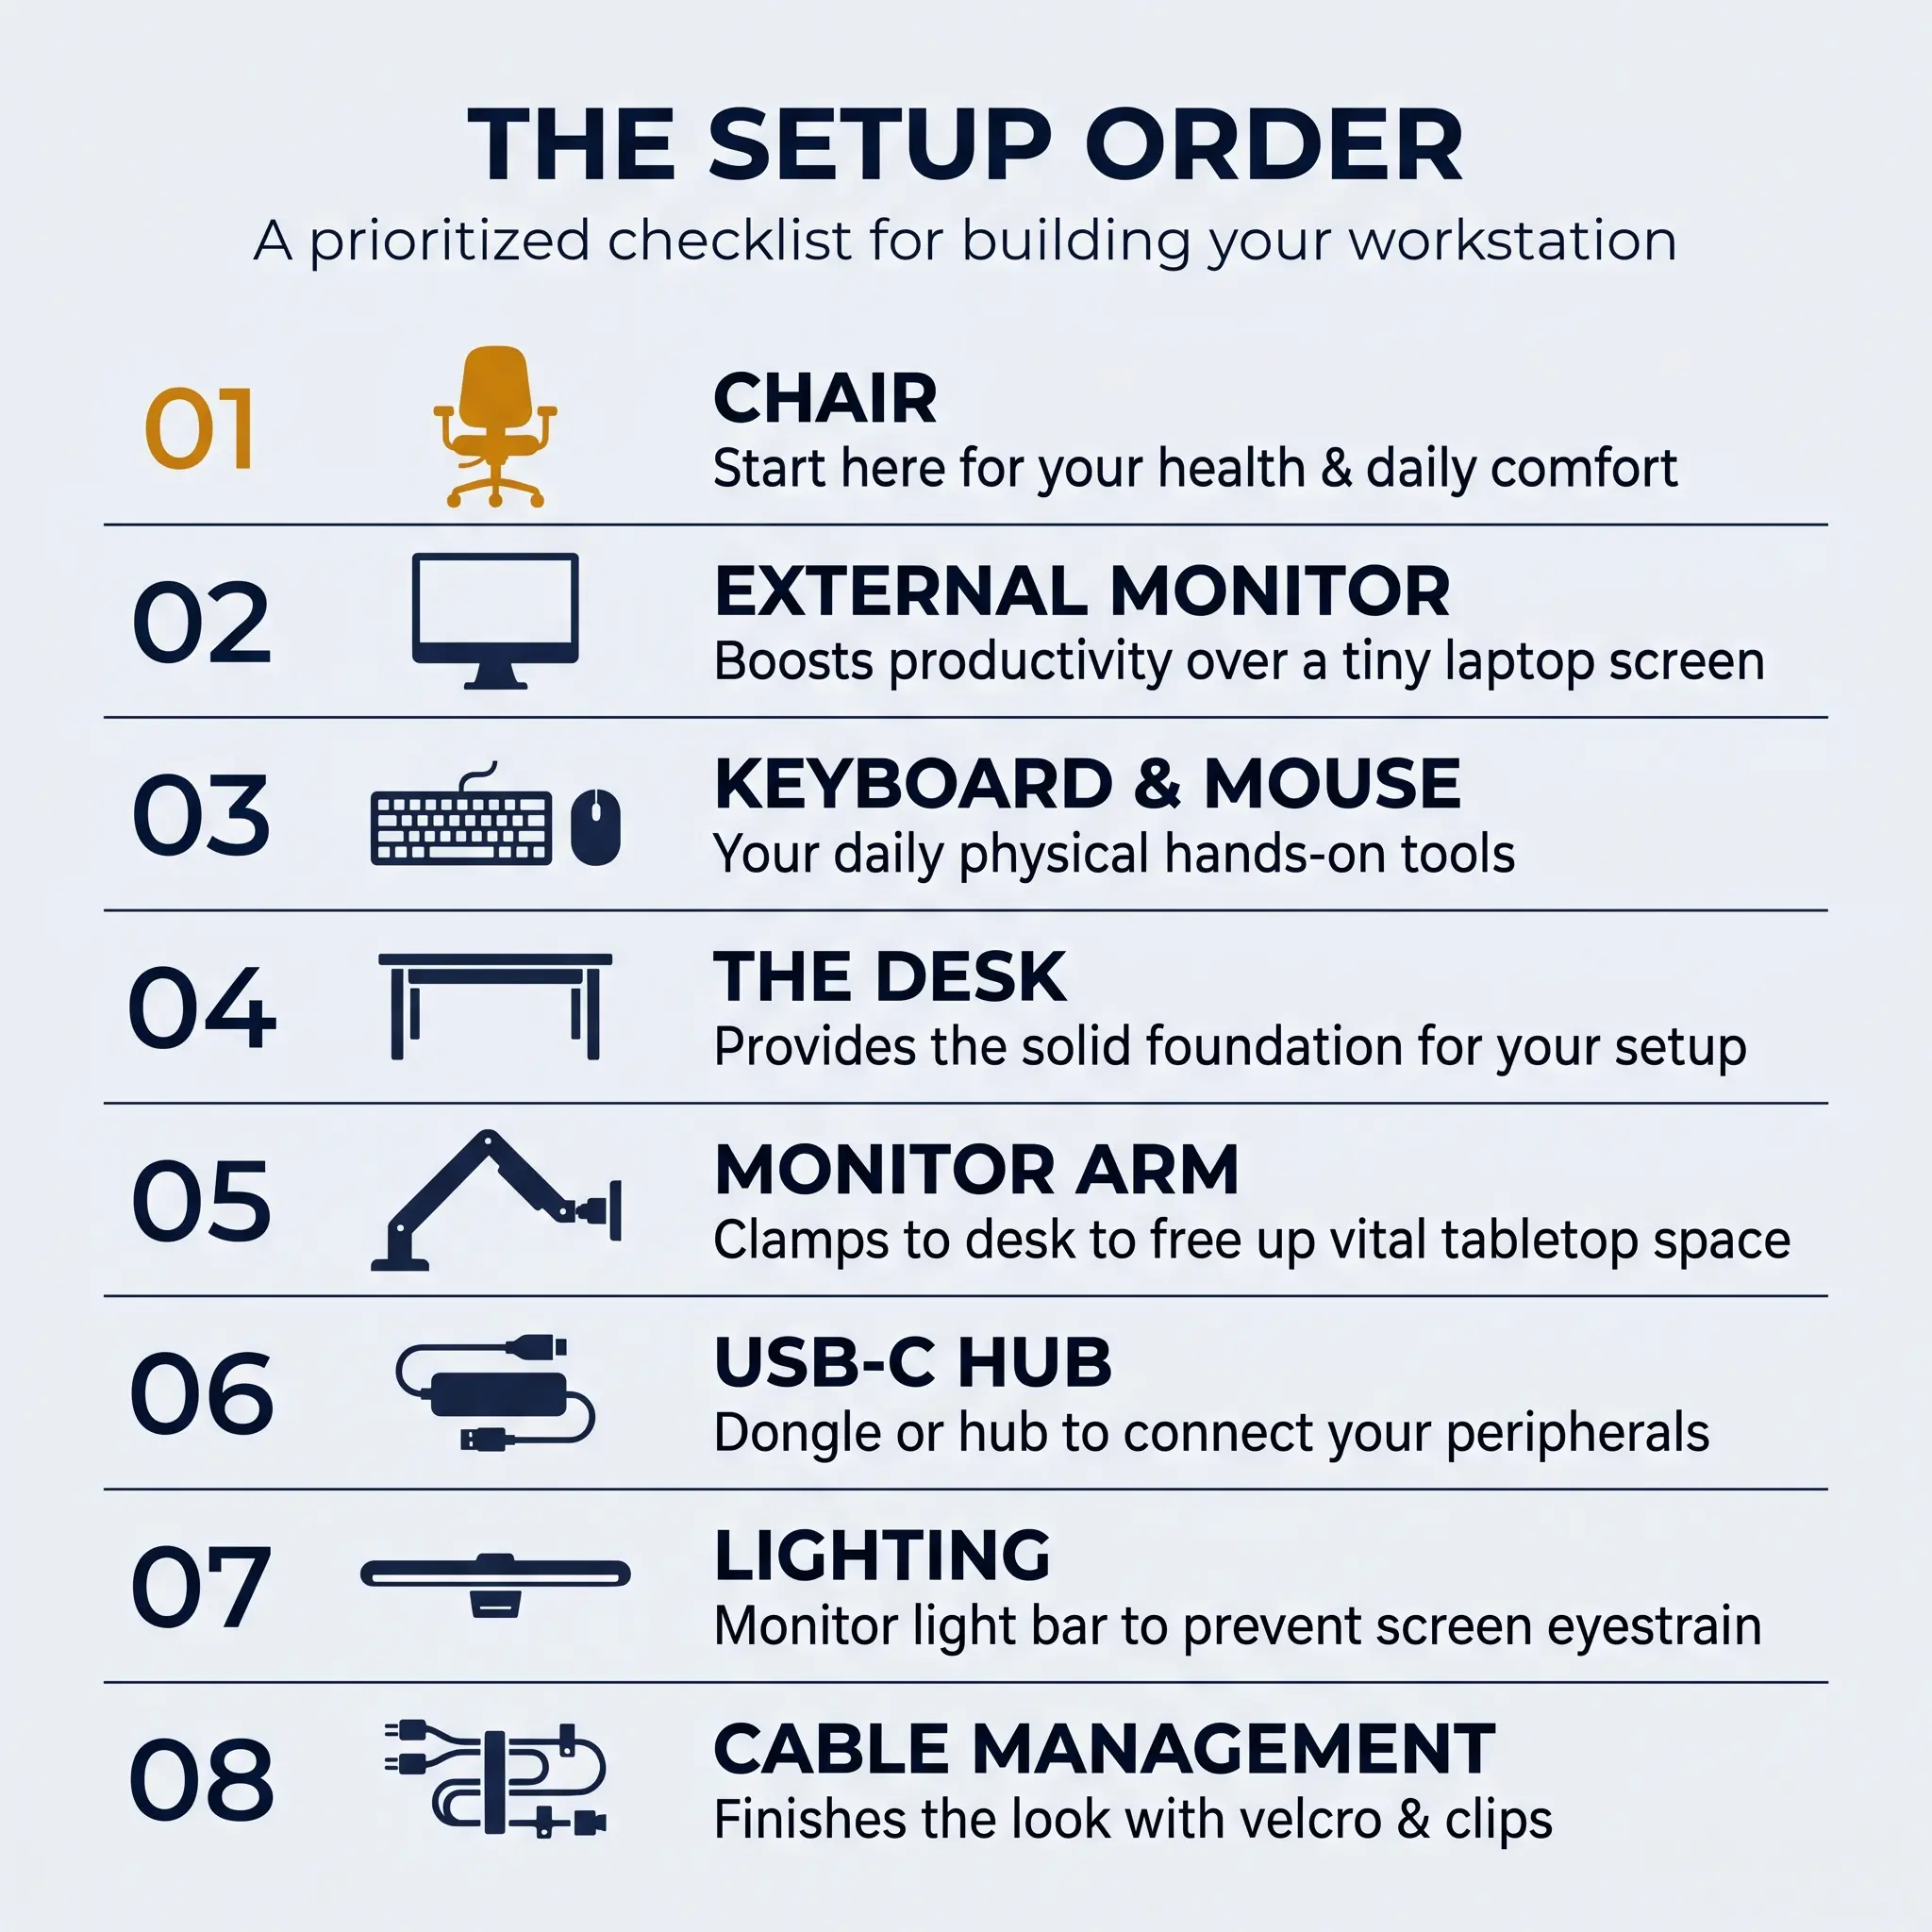
What to Build Today With a Realistic $500 Budget
Spending thousands on luxury office brands is completely unnecessary when planning a home office setup on a budget. With a strict five-hundred-dollar limit, your primary goal is protecting your back and eyesight first, then wrapping up daily tools without exceeding your funds.
- Mesh office chair ($160 to $180): Thick seat cushion, adjustable lower back support, and movable armrests keep you comfortable during long shifts.
- 24-inch or 27-inch IPS screen ($120 to $140): Clear panels from Acer or AOC give sharp text, wide viewing angles, and eye-care tech for daily work.
- Keyboard and vertical mouse set ($50 to $60): A Keychron C3 Pro paired with an Anker vertical mouse keeps hand and wrist strain away.
- Steel-frame desk ($70 to $80): A simple 48×24-inch table with strong metal legs gives you steady support with zero wobble.
- 6-in-1 USB-C hub ($20 to $25): Small Anker or Baseus adapters let you plug in your screen, mouse, and power using one cable.
- Monitor light bar and cable ties ($20 to $25): A Quntis screen lamp cuts glare on your desk, while basic velcro ties bundle loose wires.
Planning your spending around these real prices gives you a clean, practical home office setup while saving over a thousand dollars.
Pingback: How to Protect Your Eyes and Health While Studying - bigsavetrove.com